.svg "Paula")

Prefer to watch? The video covers the same configuration, in the same order. Every screenshot below expands on click.
HubSpot's buyer intent tool identifies companies that are showing signs they are ready to buy: they are visiting your website, researching your topics across the web, or hitting milestones like funding rounds and executive hires. This guide walks through the full configuration, so you can act on warm prospects instead of cold lists.
On this page
01
What is buyer intent?
Buyer intent is the set of signals buyers put out when they intend to purchase a product or service. Nobody fills out a form the moment they start shopping. They visit pricing pages, compare vendors, and read up on the problem they want solved. HubSpot's buyer intent tool captures those behaviors and turns them into a working list of companies worth a conversation.
HubSpot groups the signals into four families:
Who's on your site
Page visits, repeat visits, and the specific paths a company follows, like your pricing page.
Who's researching your topics
Reading, comparing, and downloading content about your topics across the web.
Hires, funding, launches
External events worth a timely call: funding rounds, executive hires, expansions, acquisitions.
Job changes, email bounces
Person-level changes surfaced through CRM enrichment.
One caveat on tracking people rather than companies. HubSpot can tell you that a specific person is on your site only if that person previously filled out a form on your website, which lets HubSpot connect their browser cookie to a contact record. Otherwise, identification happens at the company level.
02
Where does the data come from?
First-party data is created on your own website. With the HubSpot tracking code installed, HubSpot uses browser cookies and reverse-IP lookup to build a profile of each visit: pages viewed, visit count, time on page, and the company behind the IP address.
Second-party data is the same kind of data, pooled across HubSpot's customer base. HubSpot has more than 250,000 customers running its tracking code, which gives it visibility into buying activity far beyond your own site.
Third-party data comes from HubSpot's network of external sources: an intent network of over 200,000 websites plus news feeds that track company events like funding rounds, executive changes, and liquidity events.
03
What do you need before you start?
Four things, and it is worth confirming all of them before you touch the configuration screens.
- The right subscription. Buyer intent is available on Starter, Professional, and Enterprise tiers of Marketing, Sales, Service, Content, Data, and Commerce Hubs. See HubSpot's documentation for current requirements.
- HubSpot Credits. Credits are the currency the tool spends when it adds or tracks companies: 500 a month on Starter, 3,000 on Professional, 5,000 on Enterprise (5,000 and 10,000 with Data Hub or the full Customer Platform). Extra credits cost about US$10 per month per 1,000, and unused credits expire monthly. Exact figures in HubSpot's Product and Services Catalog.
- The tracking code on your website. This is how HubSpot sees who is visiting. On HubSpot's CMS it is already there; otherwise install it before you expect visitor data. New installations can take a day to start reporting.
- User permissions. Super Admins have access to everything. Everyone else needs the Buyer Intent permission granted explicitly, which is Step 1 below.
Step 1
Grant users access to buyer intent
- Go to Settings (the gear icon in the top navigation).
- Open Users & Teams and select the user.
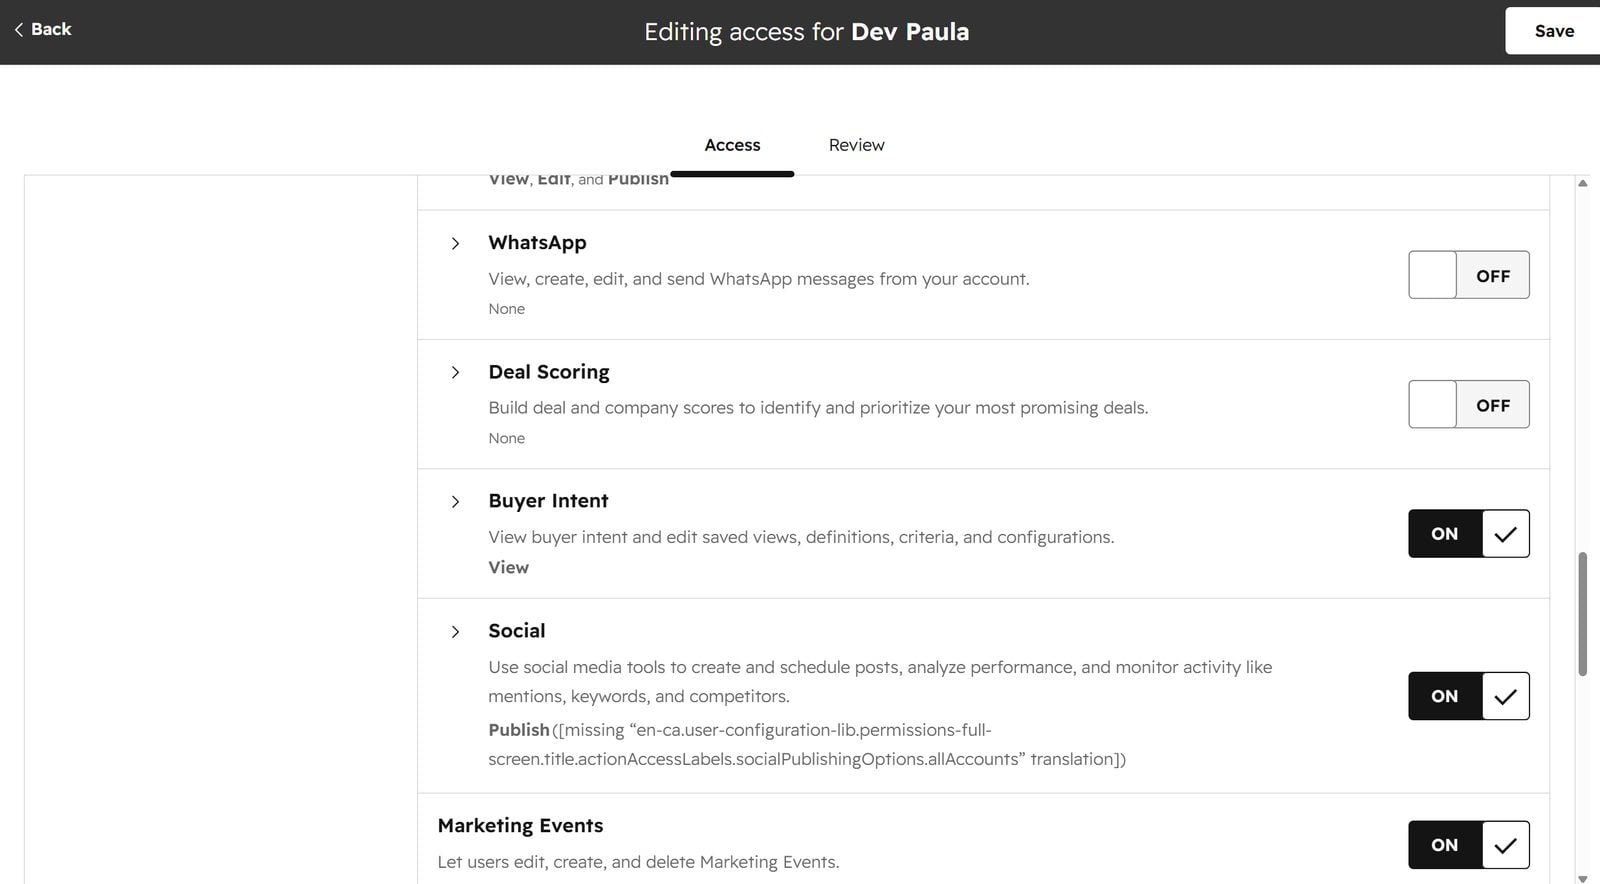
- Click Edit permissions.
- Scroll to the Marketing section, or search for “Buyer Intent”.
- Toggle Buyer Intent on. Give Edit access to anyone who will configure the tool, not just view it.
- Click Save. The user may need to log out and back in before the change takes effect.
Step 2
Open buyer intent and get oriented
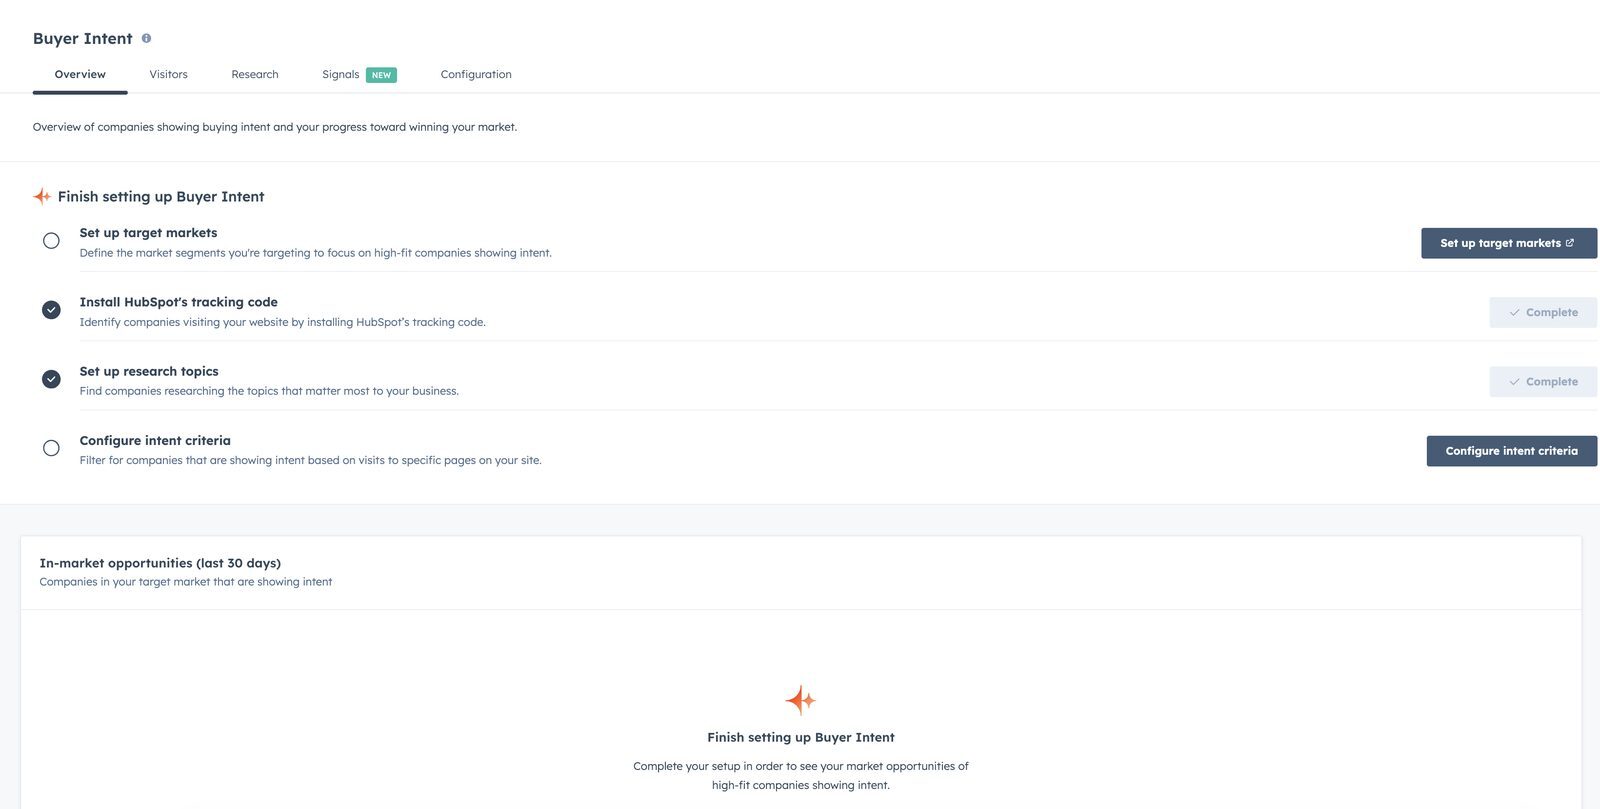
In the left menu, go to Marketing > Buyer Intent. You will find five tabs across the top: Overview, Visitors, Research, Signals, and Configuration. The first time you open the tool, the Overview tab shows a setup checklist rather than data.
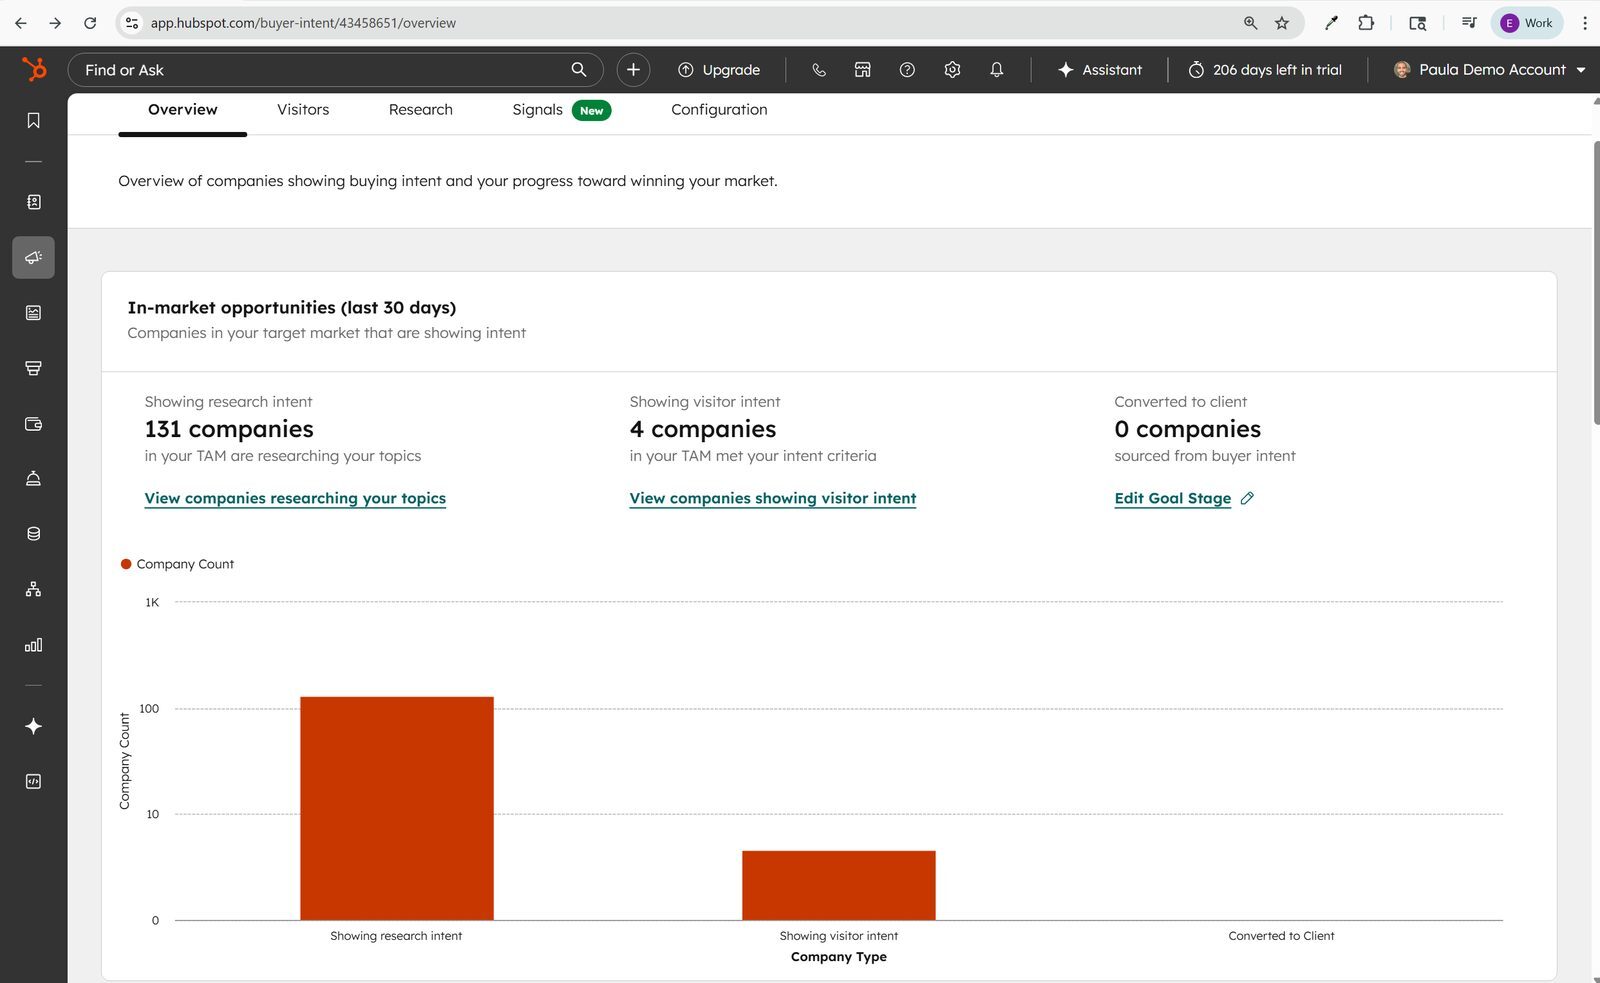
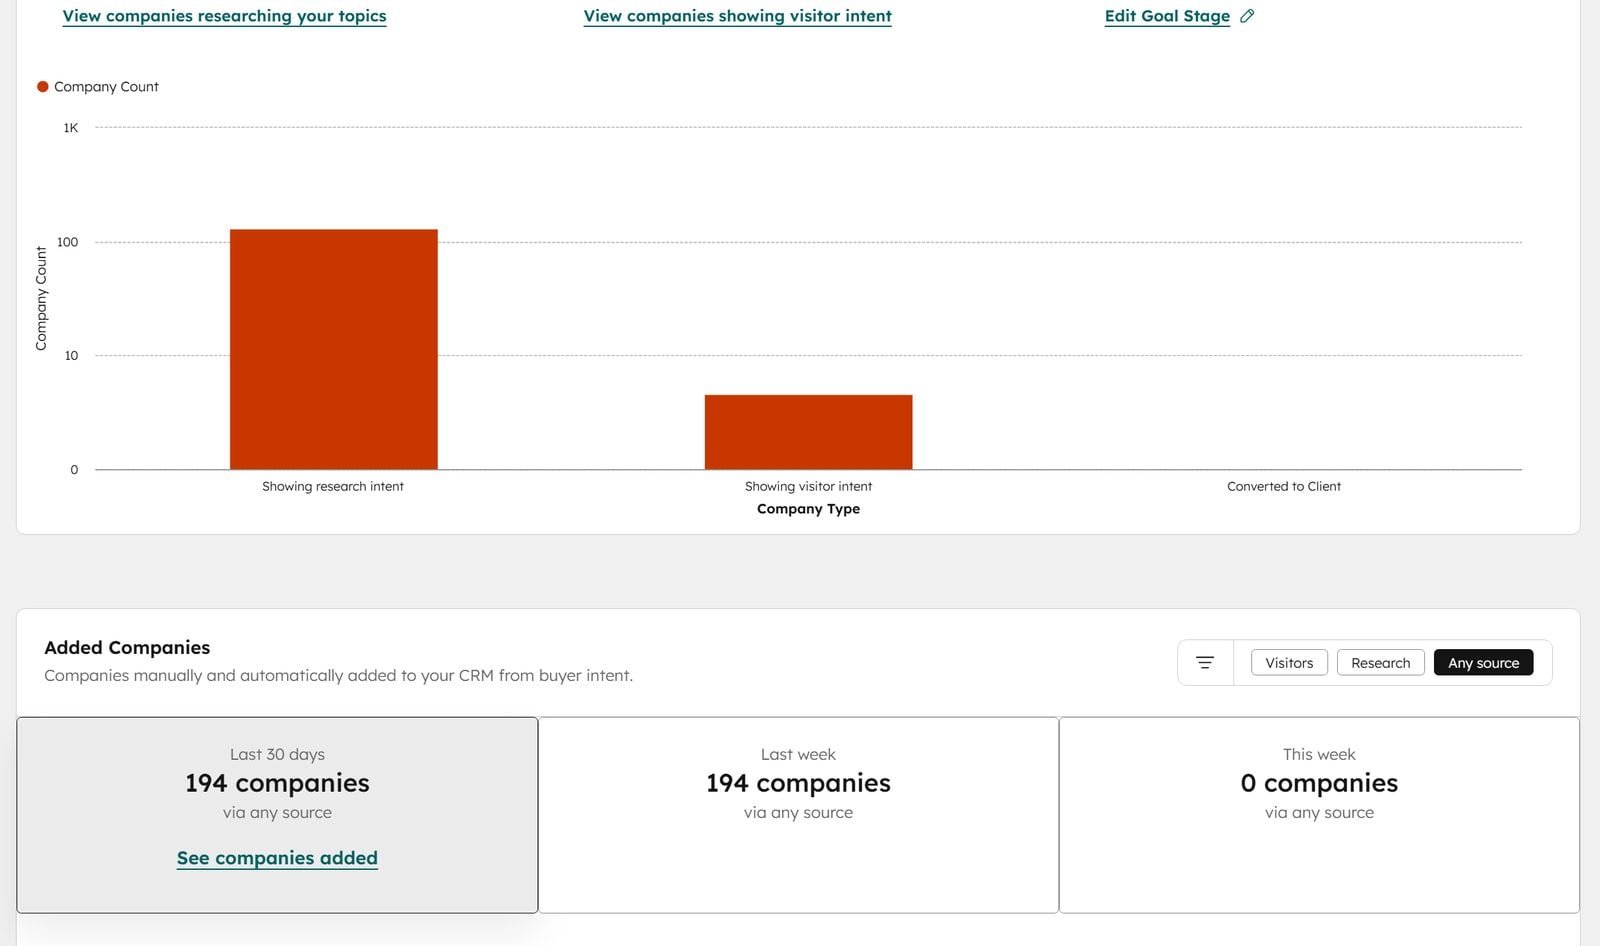
Once configured, the Overview becomes your reporting dashboard. It answers three questions at a glance: how many companies in your total addressable market are researching your topics, how many met your visitor intent criteria, and how many buyer-intent-sourced companies converted to clients.
Step 3
Define your target markets
Target markets tell HubSpot what a good-fit company looks like, and together they form your total addressable market, or TAM. Every intent report gets more useful once HubSpot can distinguish a target-market company from a random visitor.
- From the buyer intent tool, open the Configuration tab, find the target markets section, and click Manage markets. You can also reach the same screen from Settings under Data Management > Markets.
- Click Create new market and name it.
- Add criteria: industries, company keywords, employee range, countries and cities, web technologies the company uses, and revenue. You can also exclude specific criteria.
- Click Create market. HubSpot shows how many companies match, and that count becomes your TAM.
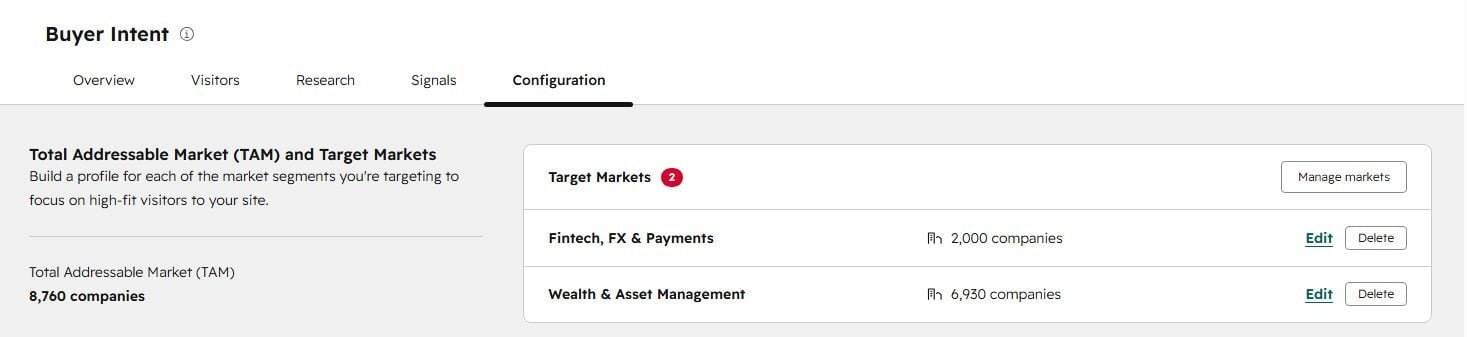
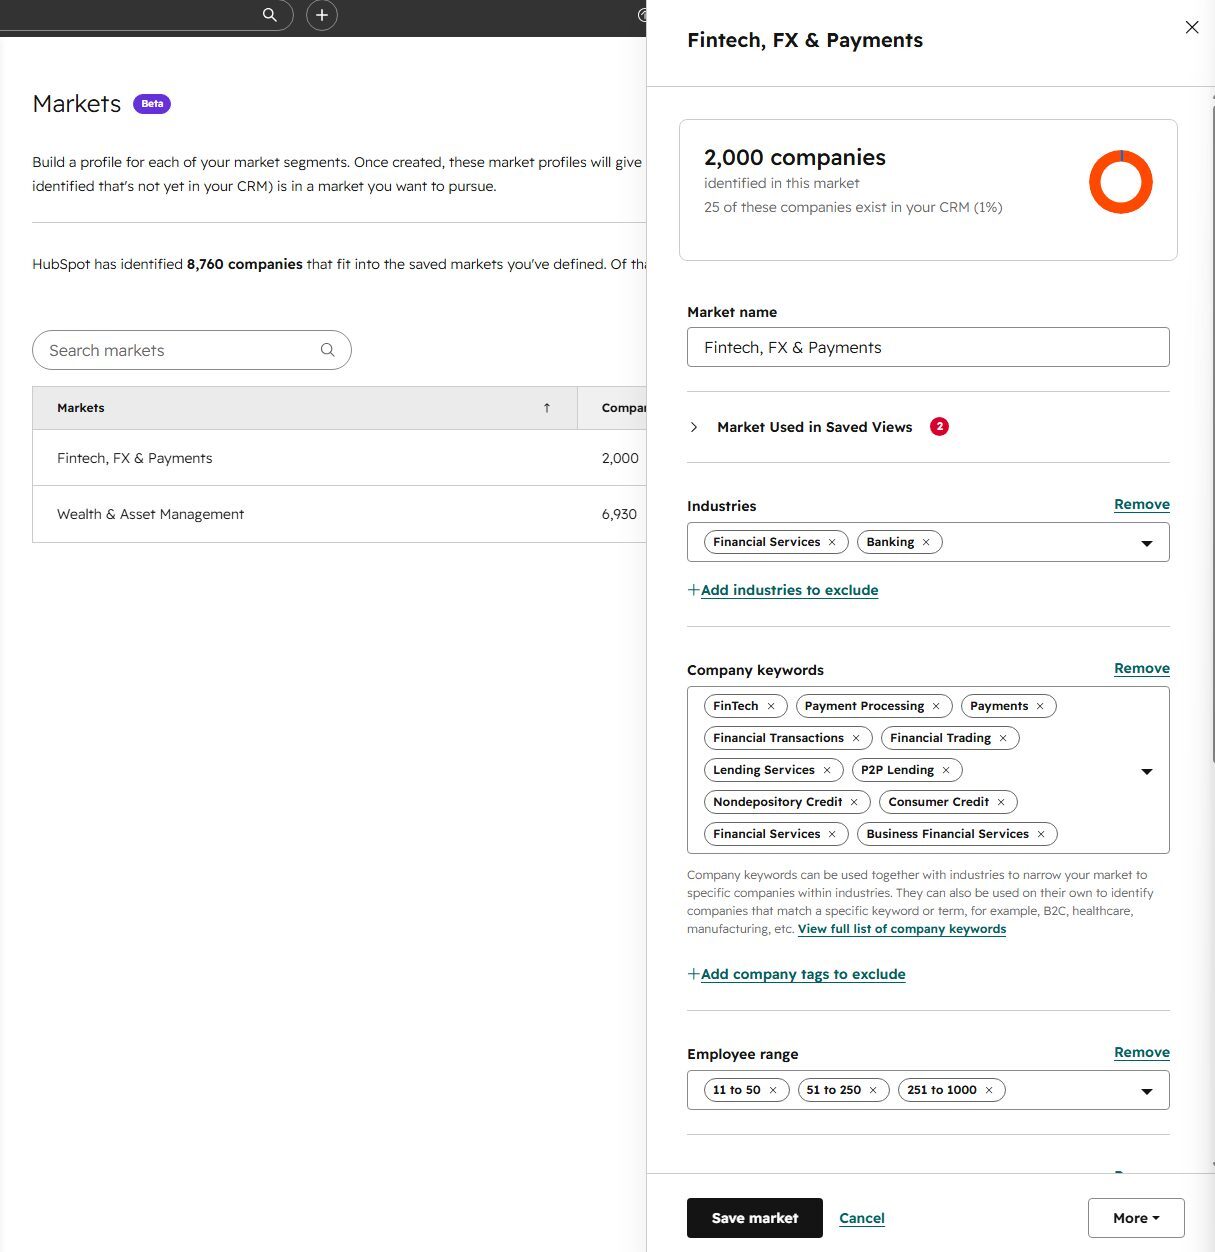
You can create up to 20 markets. Past that, delete one to make room. Details in HubSpot's guide to markets.
Step 4
Set your visitor intent criteria
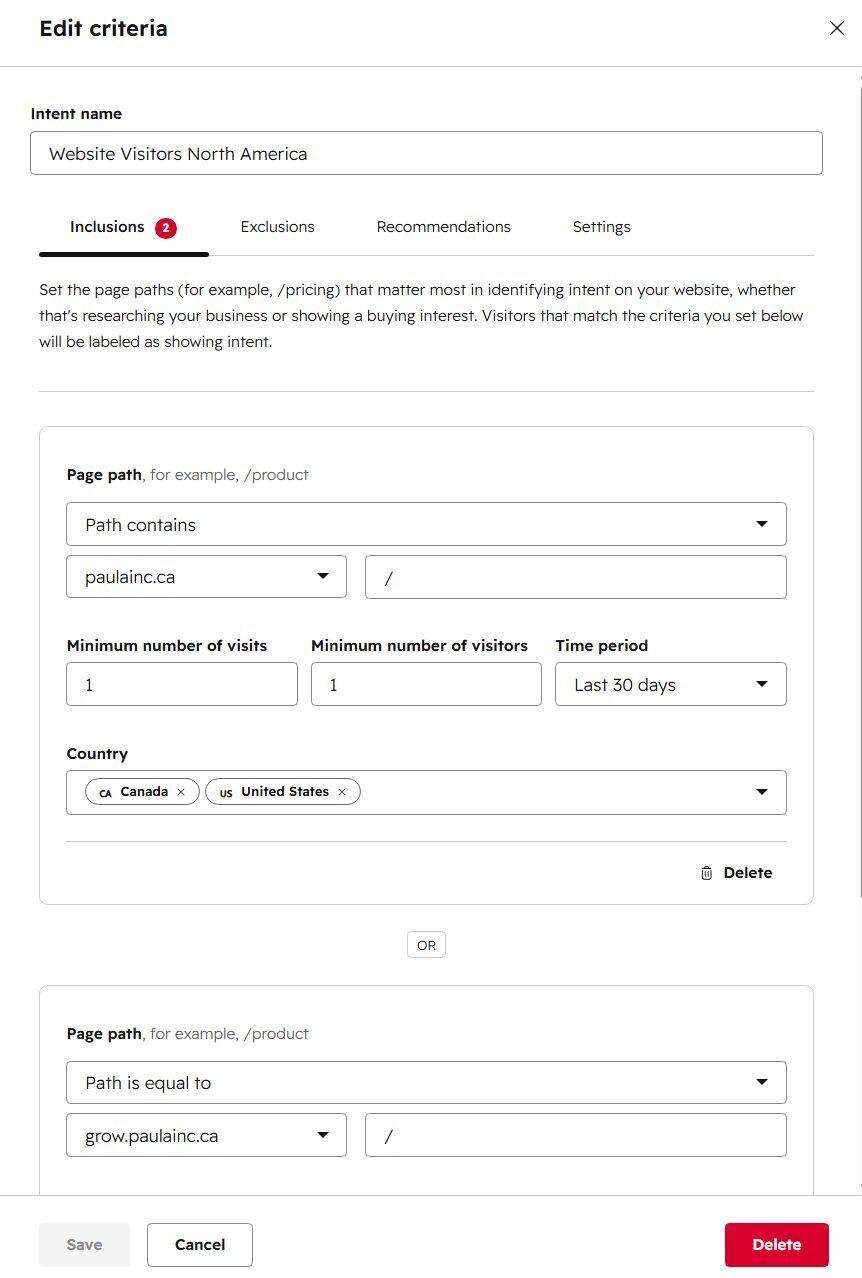
Visitor intent criteria define which website behavior counts as intent. Anyone can land on your homepage once. Somebody from Canada or the US who hits your pricing page twice in a week is a different story, and that is exactly what a criterion describes: page paths plus visit thresholds plus recency, with optional country filters.
- In the Configuration tab, find Visitor Intent Criteria and click Add visitor intent criteria. You can create up to 10.
- Name the criterion, then set the inclusion rules: page path (with operators like “path contains”), minimum visits, minimum unique visitors, time period (up to the last 90 days), and country.
- Use the Exclusions tab to keep internal or test pages out of the count.
- Save. Matching companies are labeled as showing visitor intent throughout the tool.

Map each criterion to a custom property
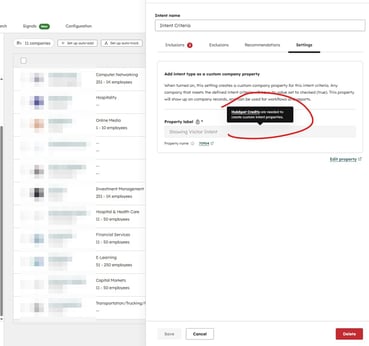
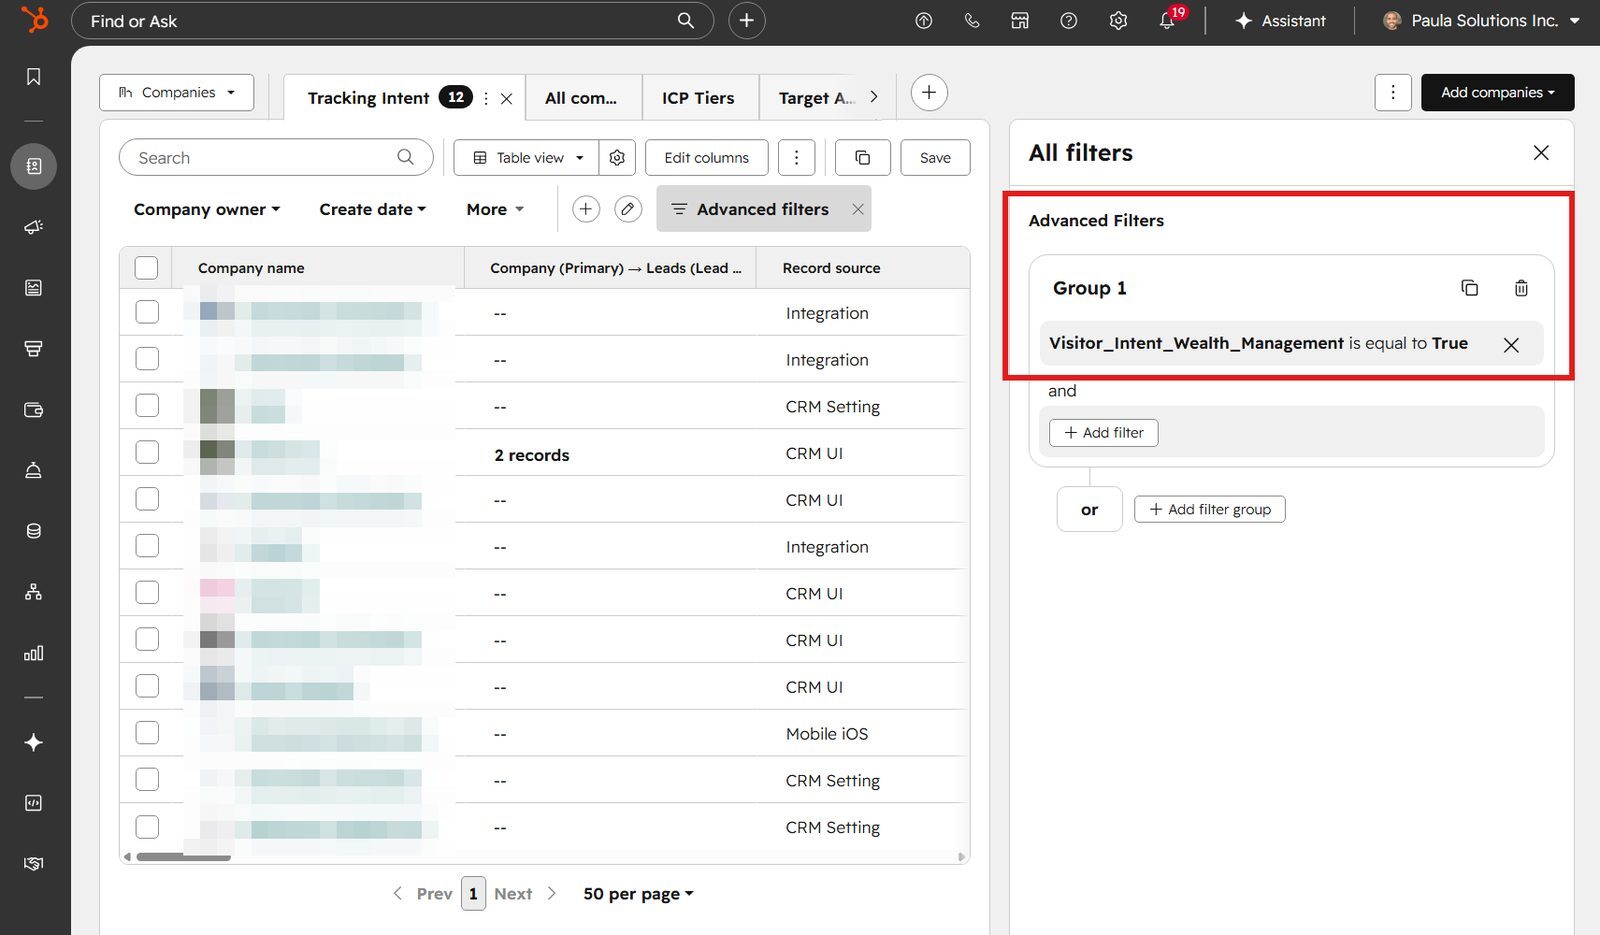
Open the Settings tab inside the criteria editor and turn on “Add intent type as a custom company property”. HubSpot creates a company property that flips to true for any company meeting the criterion. That one setting is what lets you use intent everywhere else in HubSpot: filter a company view by it, enroll matching companies in a workflow, or segment lists and reports by it. HubSpot Credits are required to create custom intent properties.
Step 5
Choose your research intent topics
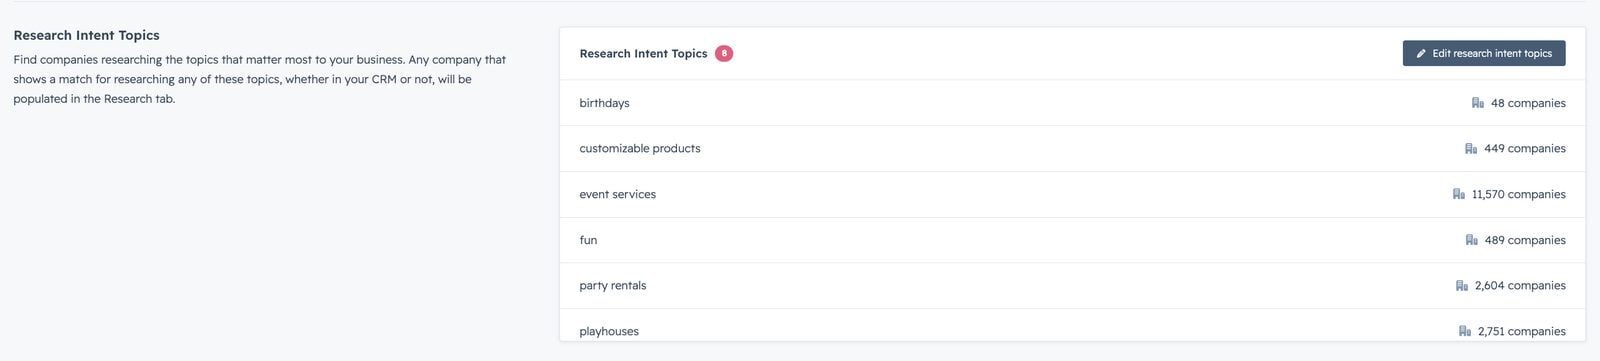
Research intent topics tell HubSpot what your potential clients search for when they are shopping for what you sell. Any company researching those topics across HubSpot's intent network will surface in your Research tab, whether or not it is in your CRM.
- In the Configuration tab, find Research Intent Topics and click Edit research intent topics.
- Enter your company URL. HubSpot reads your site and recommends topics that match your content. You can also search by keyword.
- Click Add next to each topic worth tracking, then save.
Step 6
Understand credits, then cap them
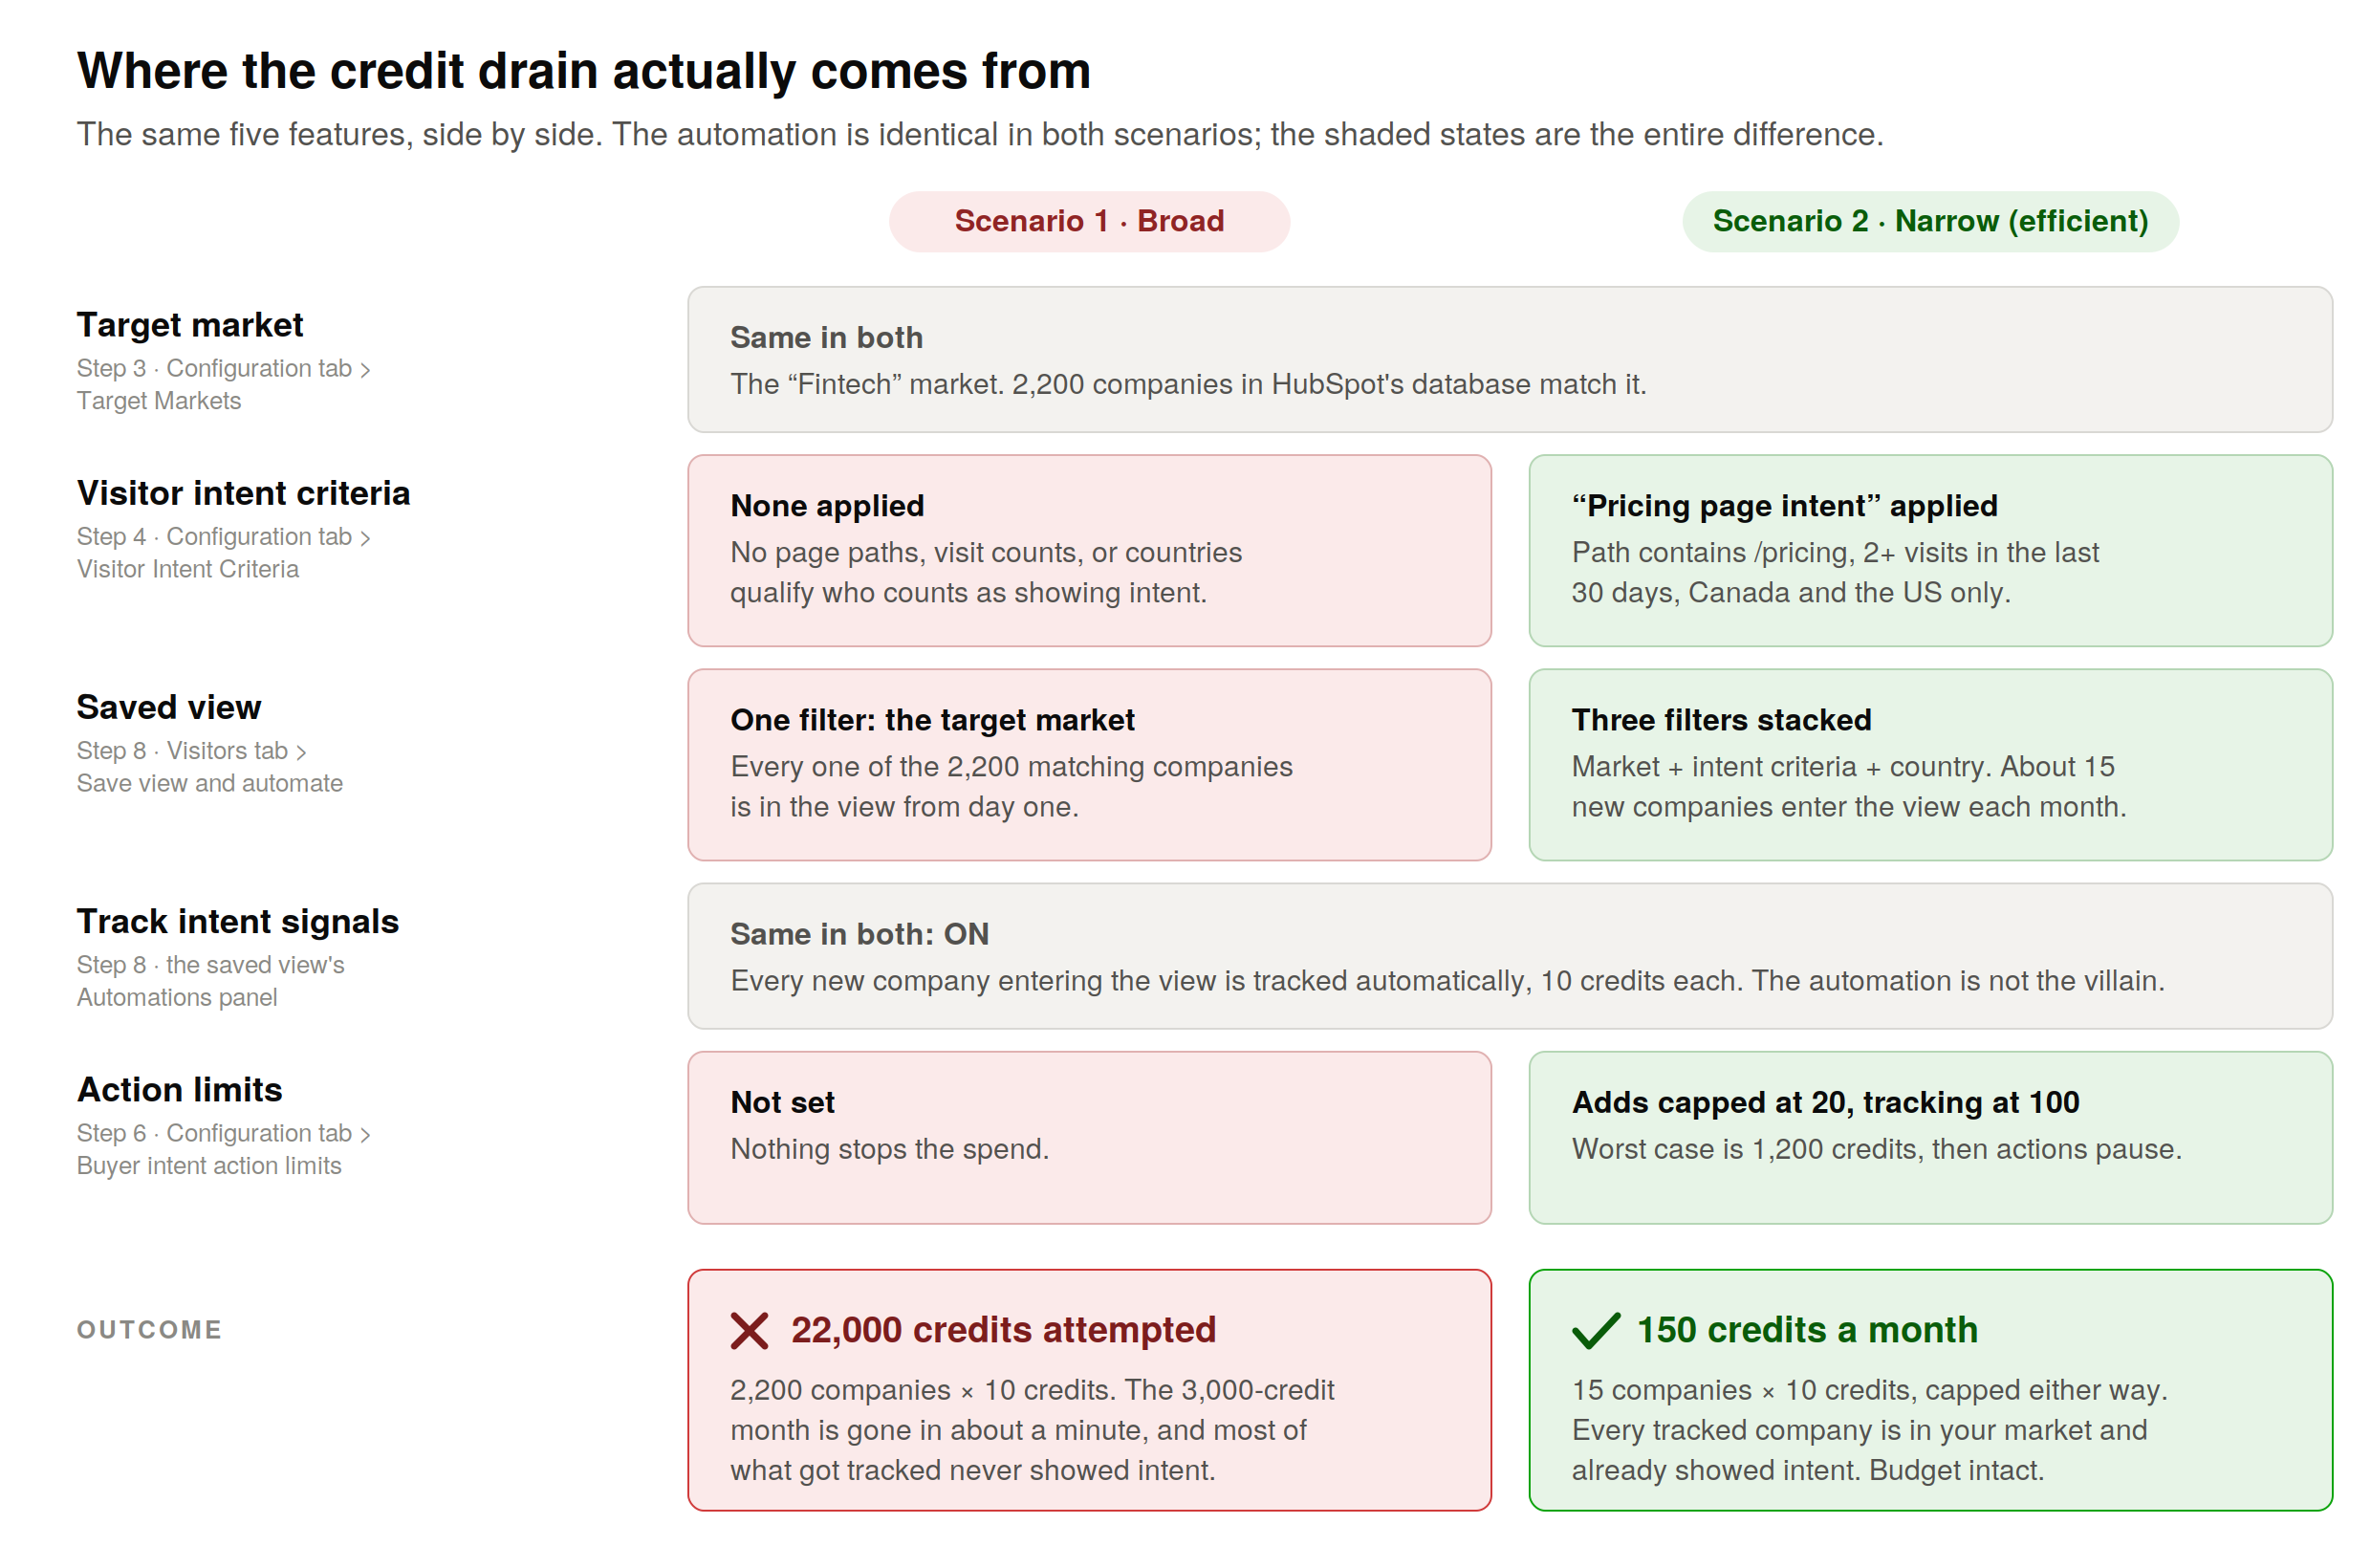
Two actions in buyer intent consume credits. Adding a company creates the record in your CRM. Tracking a company monitors it for intent signals for a month. HubSpot's rate sheet prices “create company and/or monitor company for one month” at 10 credits per company.
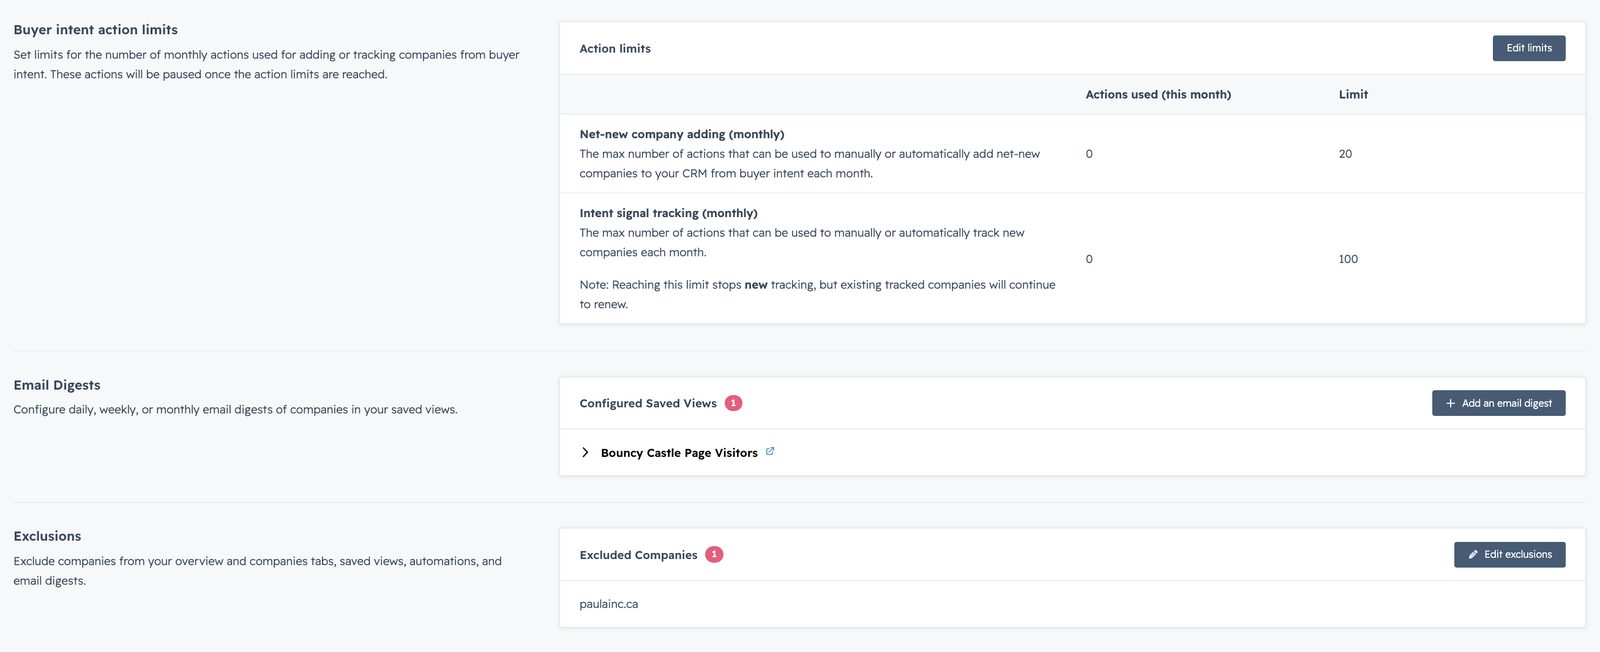
Then set action limits so nothing, human or automation, can empty the account:
- In the Configuration tab, find Buyer intent action limits and click Edit limits.
- Set a monthly cap for net-new company adding and for intent signal tracking.
- Save. Actions pause when a limit is reached. Reaching the tracking limit stops new tracking only; companies already tracked continue to renew.
Step 7
Digests, exclusions, and the tracking code
Email digests
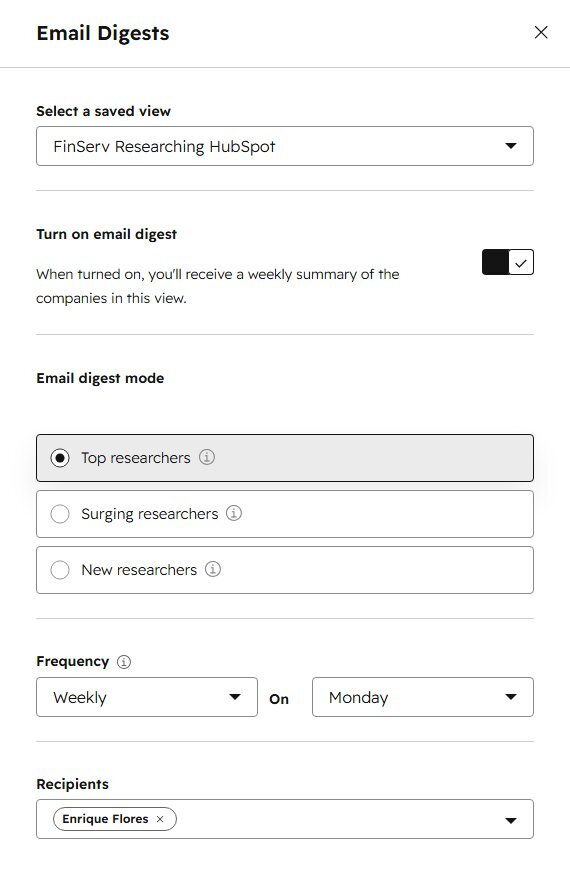
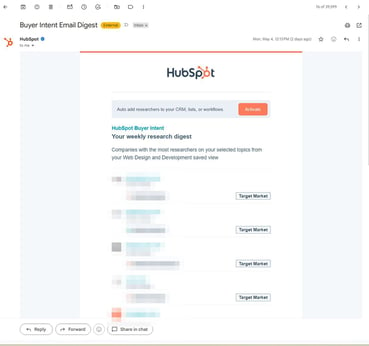
Digests deliver warm results to your inbox on a schedule, which is how most of the team should consume this data. A digest is built on a saved view (covered in the Visitors section below) and can go out daily, weekly, or monthly, arriving around 10:00 AM in your account's time zone.
- In the Configuration tab, find Email Digests and click Add an email digest (also available from the Visitors and Research tabs).
- Select the saved view and turn the digest on.
- Pick the digest mode. For a research view: Top researchers, Surging researchers, or New researchers. Visitor views offer recent-visits and most-visits modes.
- Set the frequency and day, add recipients, and save.
Exclusions
Exclude your own domains, internal staff, and active vendors so their visits stop consuming attention and credits and stop polluting reports. In the Configuration tab, find Exclusions, click Edit exclusions, and add the domains. You can exclude up to 100.
Check your tracking code
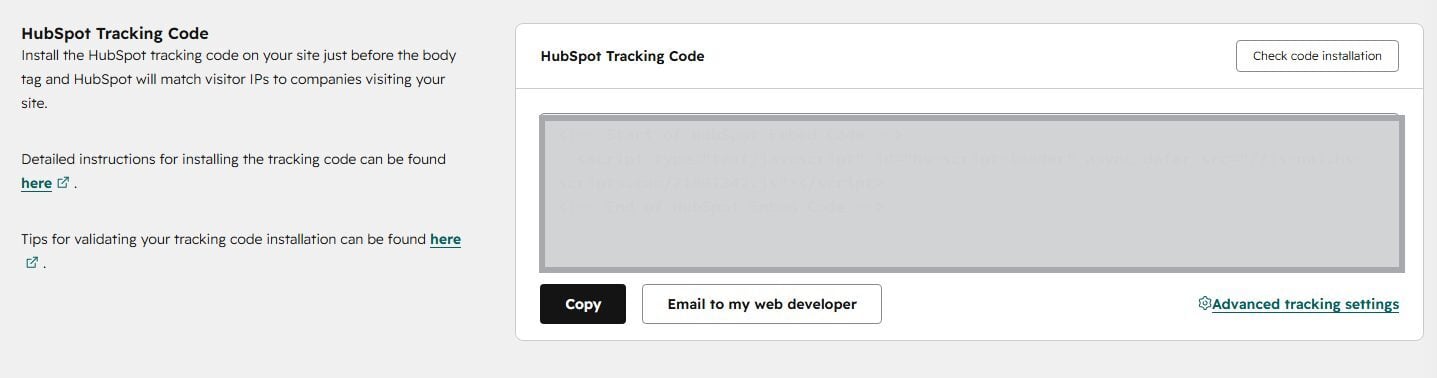
The bottom of the Configuration tab has a HubSpot Tracking Code section: copy the snippet, click Email to my web developer to hand it off, or click Check code installation to confirm it is firing. If the Visitors tab ever looks empty, this check is the first diagnostic.
Configuration done. The three tabs below are where you will actually spend your time, and each one answers a different question.
Visitors
Who is on your website right now, filtered down to the companies that behave like buyers.
Research
Who is researching your topics across the web, before they ever reach your site.
Signals
Your tracked watchlist: every signal type per company, plus external company news.
Tab 1
The Visitors tab: who is on your site
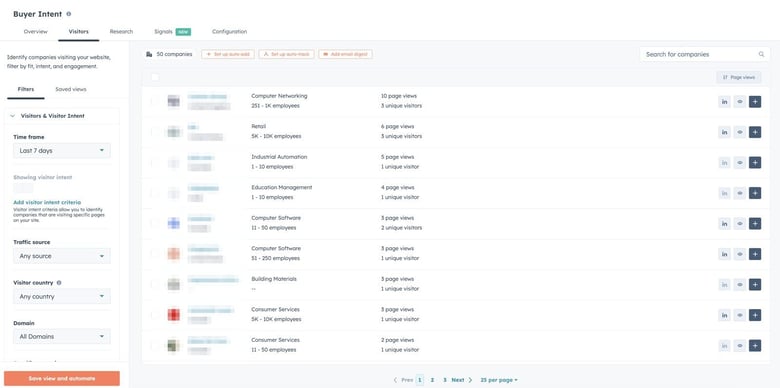
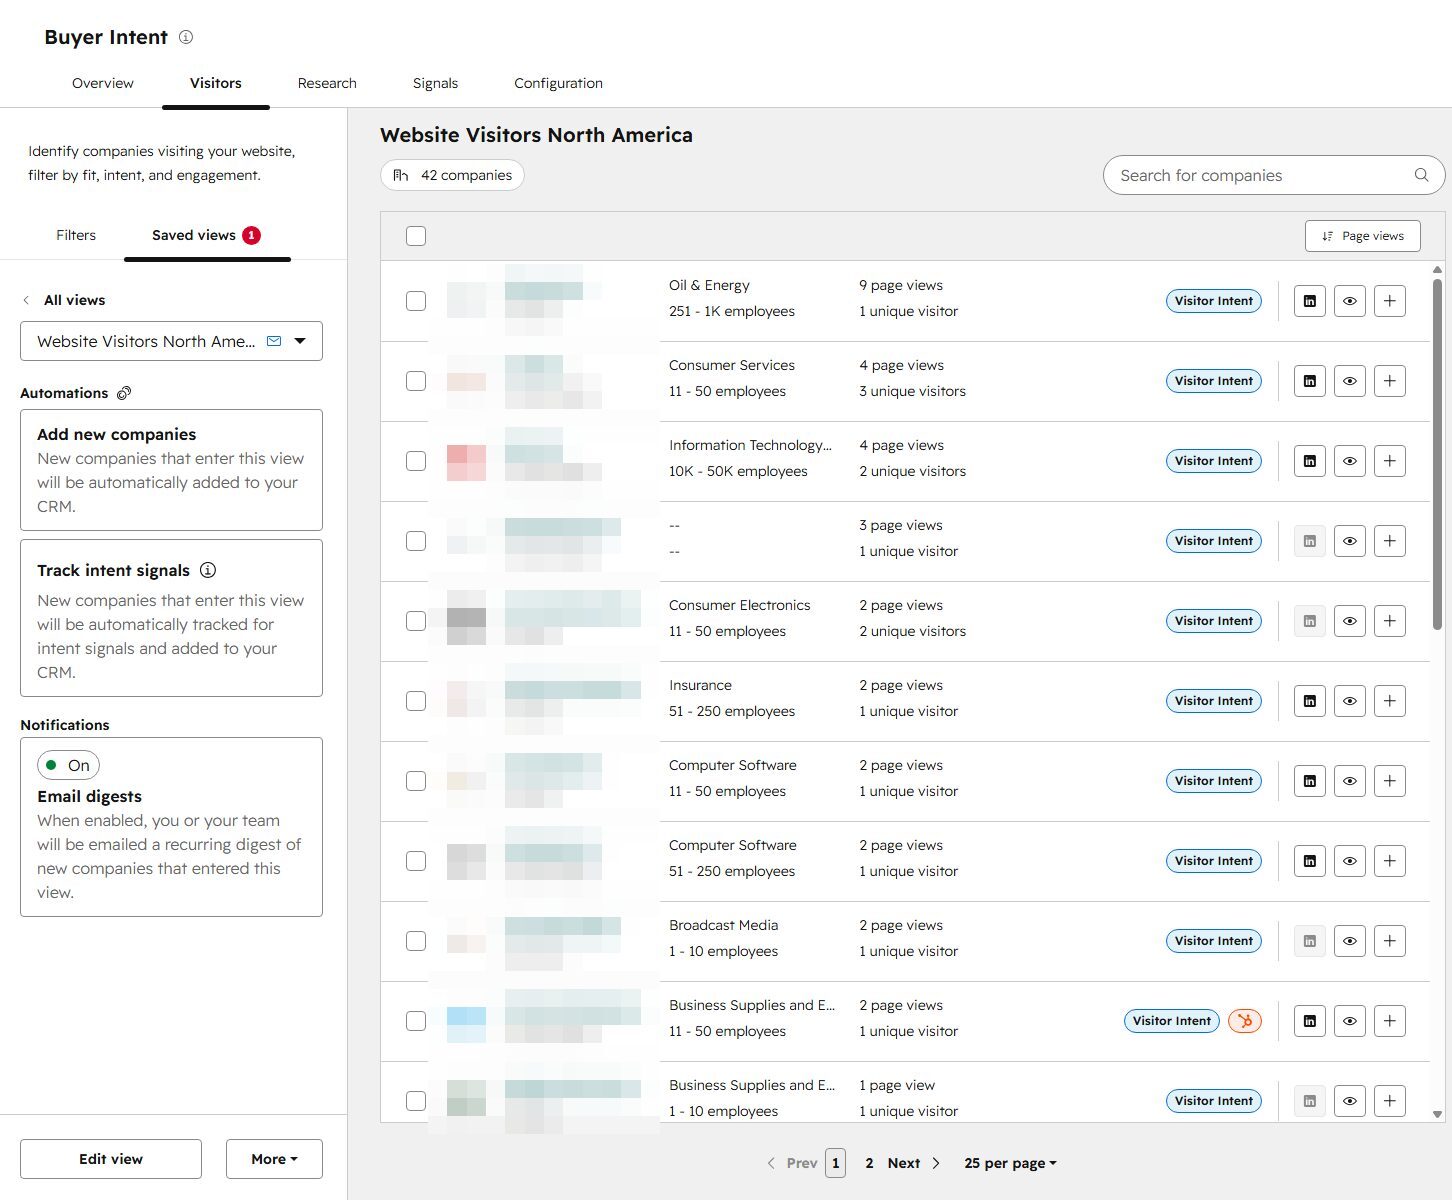
Each row is a company, with its industry, size, page views, and unique visitors, plus quick actions on the right: open its LinkedIn page, track it for intent signals (the eye icon), or add it to your CRM (the plus). Click the company name to open the detail panel.
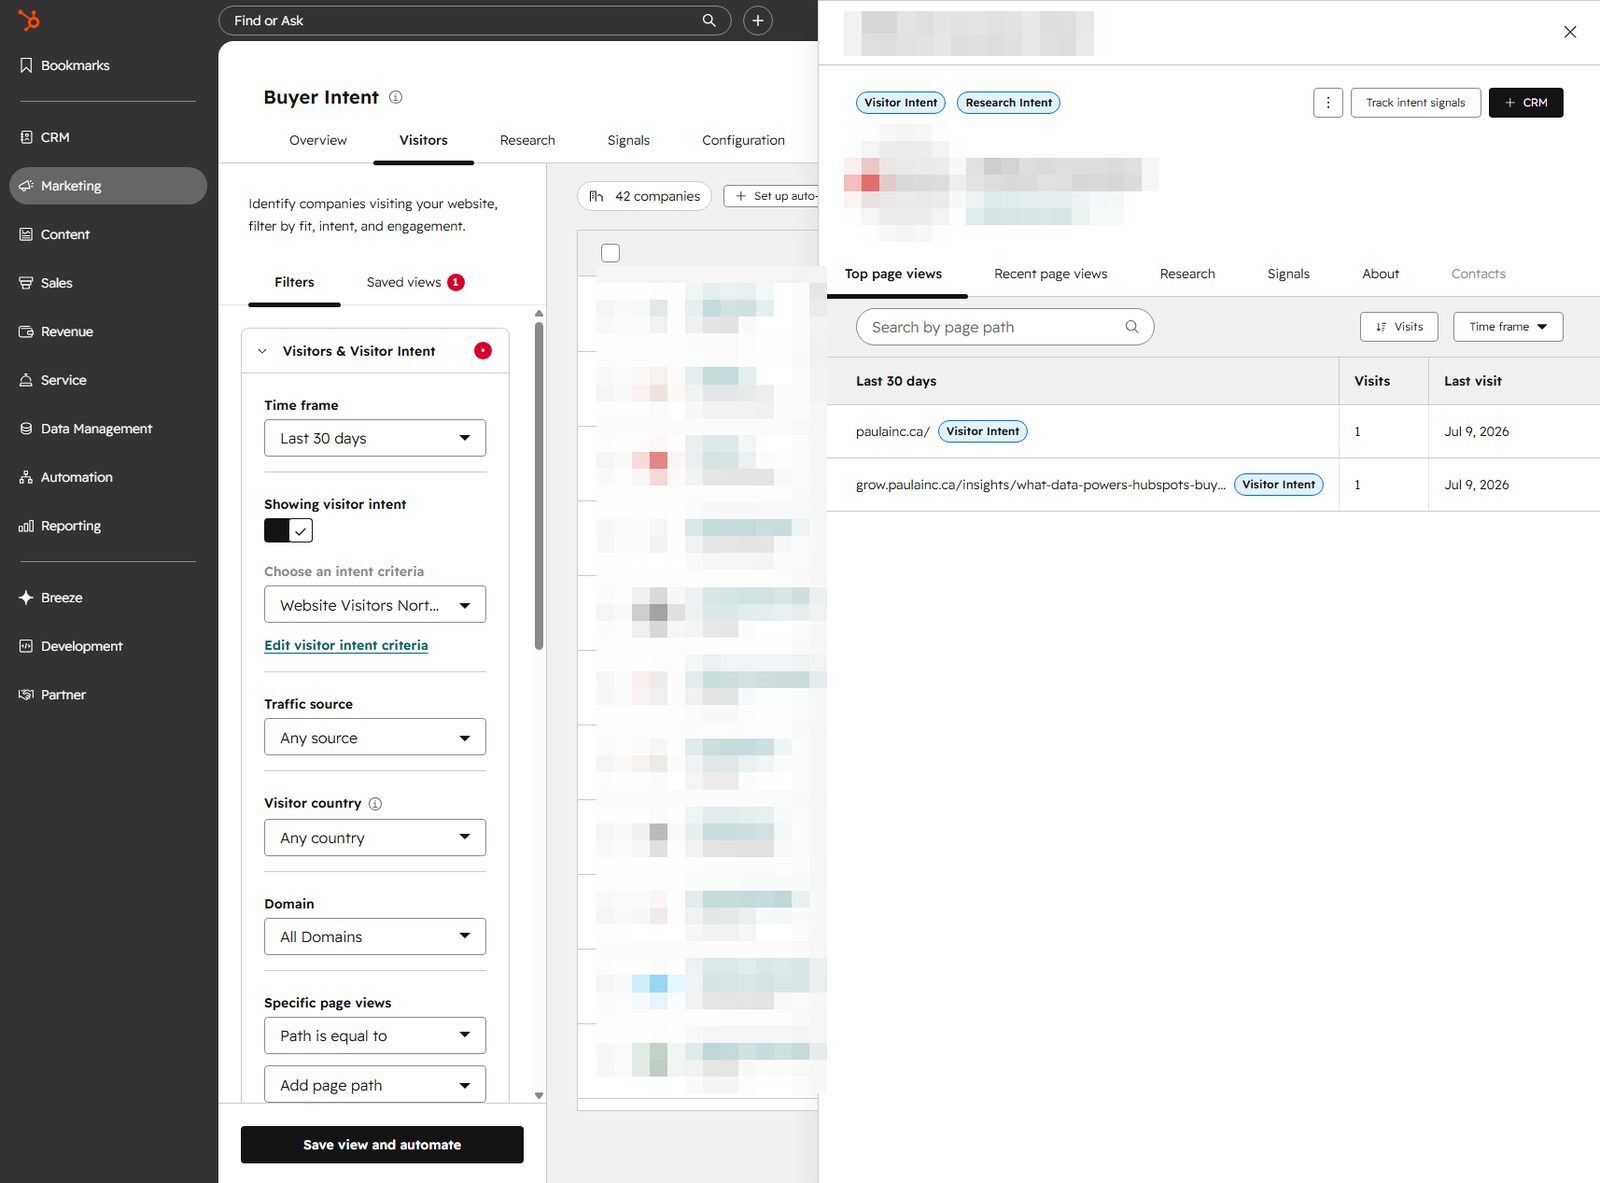
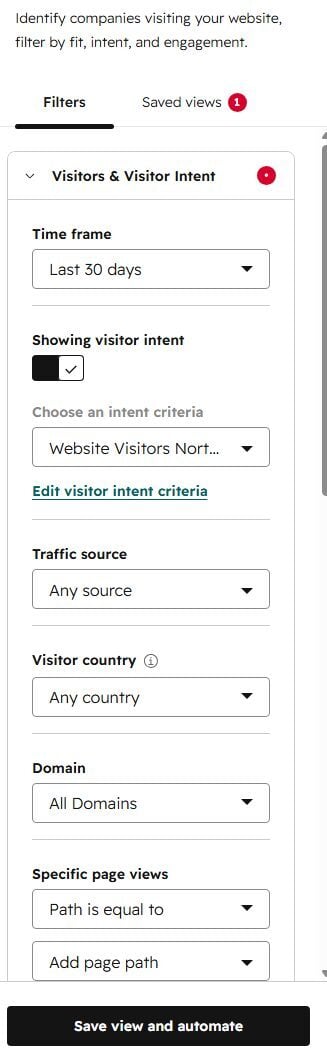
The filters, one by one
- Time frame. How far back to look, up to the last 90 days.
- Showing visitor intent. The toggle that cuts the list to companies matching one of your Step 4 criteria. This is the difference between all traffic and qualified traffic.
- Traffic source. Organic, paid, email, social, direct. Useful for judging which channels bring companies that behave like buyers.
- Visitor country and Domain. Where the visitor is located, and which of your domains they visited.
- Specific page views. Ad hoc path filtering without creating a criterion first. Promote it to a criterion if you keep asking the same question.
- Target Markets. One toggle to show only companies from Step 3's markets.
- Segments. Filter by your existing CRM segments.
- CRM. All companies, only ones in your CRM, or only ones not yet in it, plus lifecycle stage, deal stage, and owner. “Not in my CRM, in my target markets, showing intent” is a net-new pipeline list.
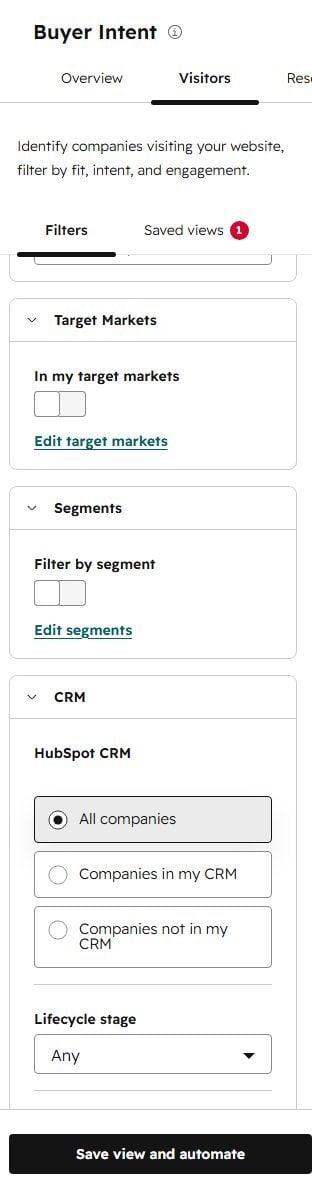
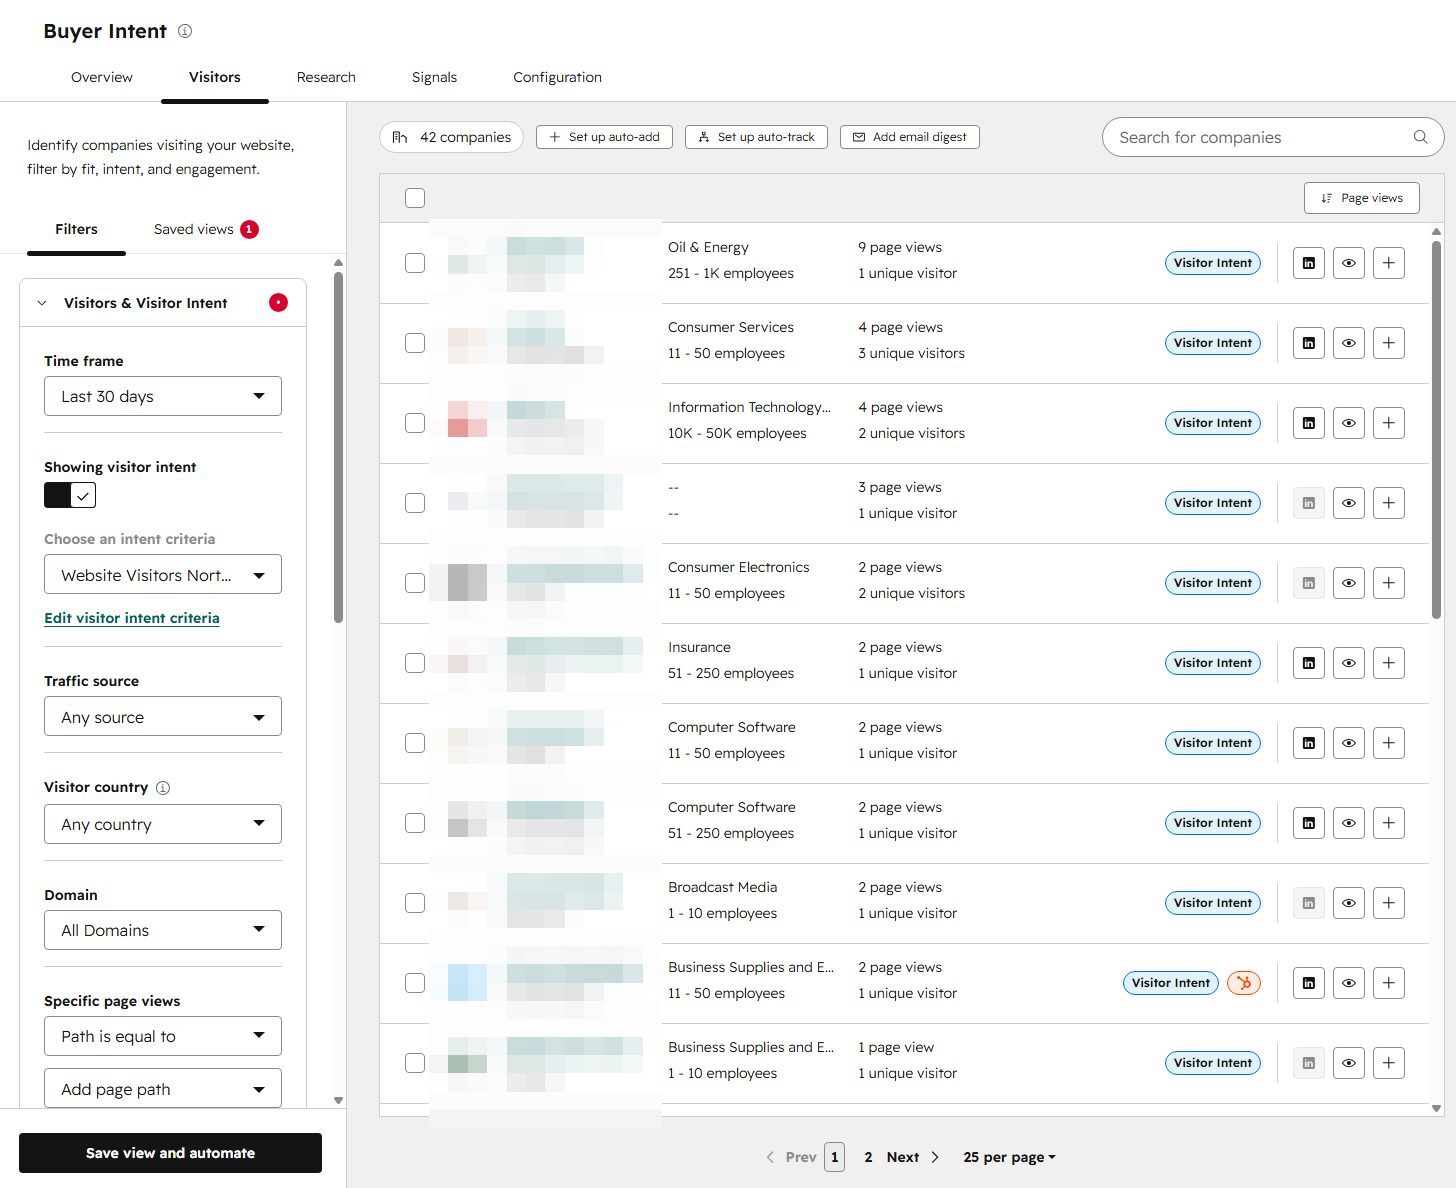
When a filter combination is worth repeating, click Save view and automate. A saved view keeps the filters, and its panel is where the leverage lives: automations to auto-add or auto-track new companies entering the view, and notifications to send the email digests from Step 7.
Tab 2
The Research tab: who is researching your topics
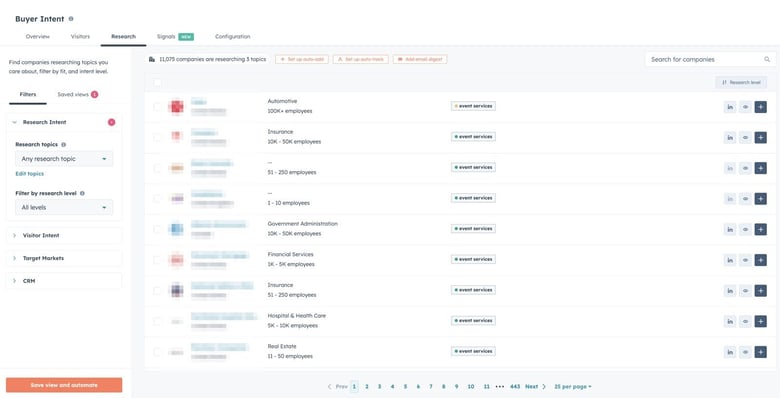
A company shows up here when people at that company are actively consuming content about one of your Step 5 topics: reading articles, comparing options, downloading resources on the subject. They may never have touched your website. HubSpot sees this because its intent network spans more than 200,000 third-party sites plus the pooled activity of its own customer base, resolved to companies through IP and cookie matching. In plain terms: these companies are shopping for what you sell, somewhere, right now.
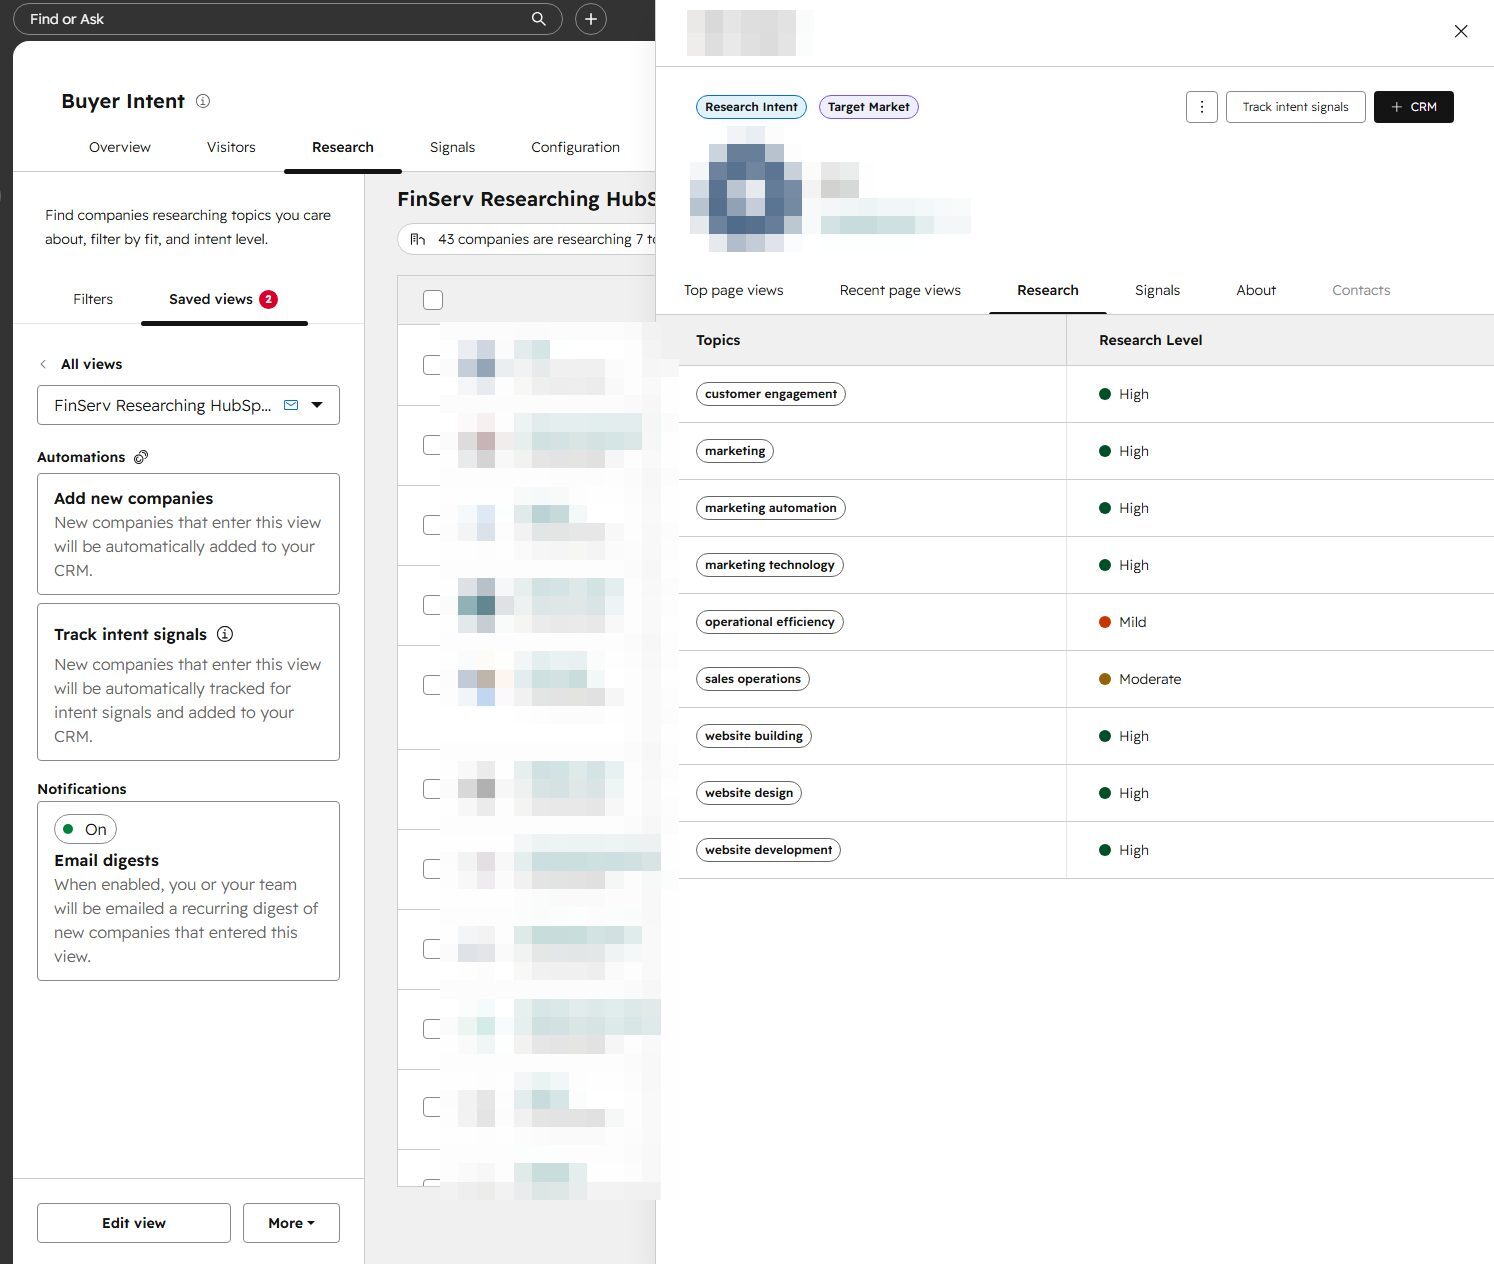
HubSpot ranks what it sees per topic as a research level: high means consistent research activity over the last 30 days, moderate means regular but not sustained activity, and mild means occasional touches. The level is the priority order. A target-market company at high on two of your topics belongs at the top of somebody's list; a mild single-topic company is a watch item.
Tab 3
The Signals tab: your watchlist, everything in one place
The Signals tab works differently from the other two, and the difference is the point. Visitors and Research are discovery surfaces: they show every company that happens to match. Signals only shows companies you have chosen to track, and for each one it aggregates every signal type in a single row: website visits, topic research, and external company news. Think of Visitors and Research as the scanner and Signals as the watchlist.
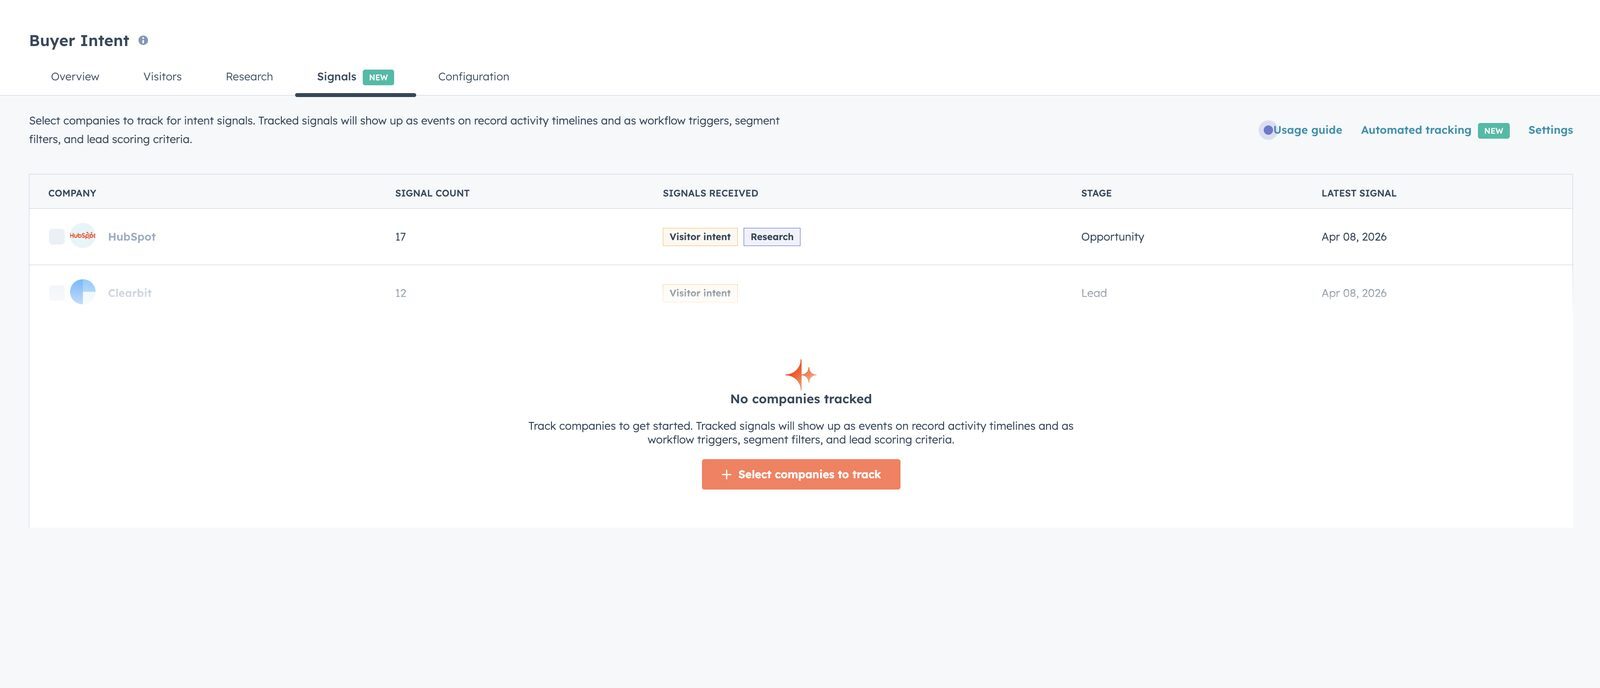
Companies get here by being tracked, the 10-credit action from Step 6: from the eye icon in the Visitors or Research lists, from the Track intent signals button on any company panel, from Select companies to track here, or automatically through a saved view's auto-track option. Each row shows the signal count, chips for the signal types received, the company's lifecycle stage so you can see where it sits in your funnel, and the latest signal date, which is effectively a freshness sort.
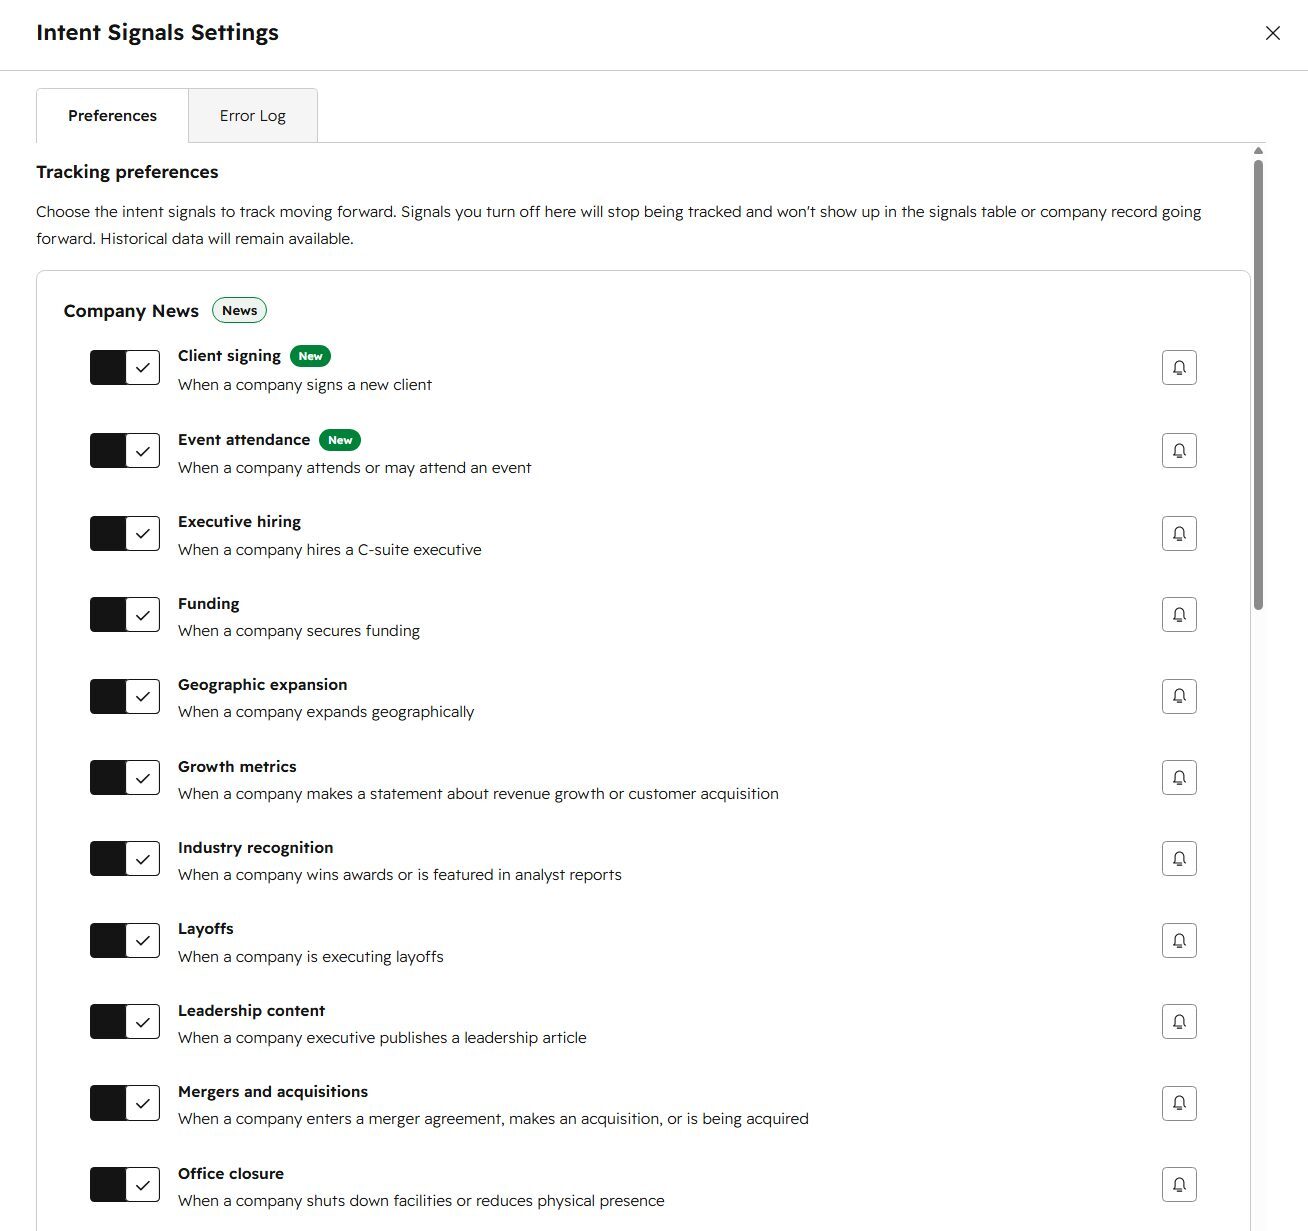
Company news is the signal family unique to this tab. Click Settings to choose which external events to monitor: client signings, event attendance, executive hiring, funding, geographic expansion, growth metrics, industry recognition, layoffs, leadership content, mergers and acquisitions, and office closures, among others. Each signal type has a bell icon for per-signal notifications. Turning a type off stops tracking it going forward but keeps history, and the Settings panel's Error Log tab is worth a glance if a tracked company seems quiet.
Two things make tracked signals more than a report. First, they land on the company record's activity timeline, so anyone opening the record sees the intent history in context. Second, they are available as workflow triggers, segment filters, and lead scoring criteria, which means a funding round or a research spike can start a sequence, move a company into a list, or bump a score without anyone watching the tab.
- Use advanced filters to work a specific angle, for example companies that secured Series B funding in the last six months.
- Read rows for compound stories: a company researching landing pages while opening a new regional office is a company preparing to spend.
- If the tab is empty, that is normal on day one. It fills as you track companies from the other two tabs.
One more setting
Lifecycle stages for conversion tracking
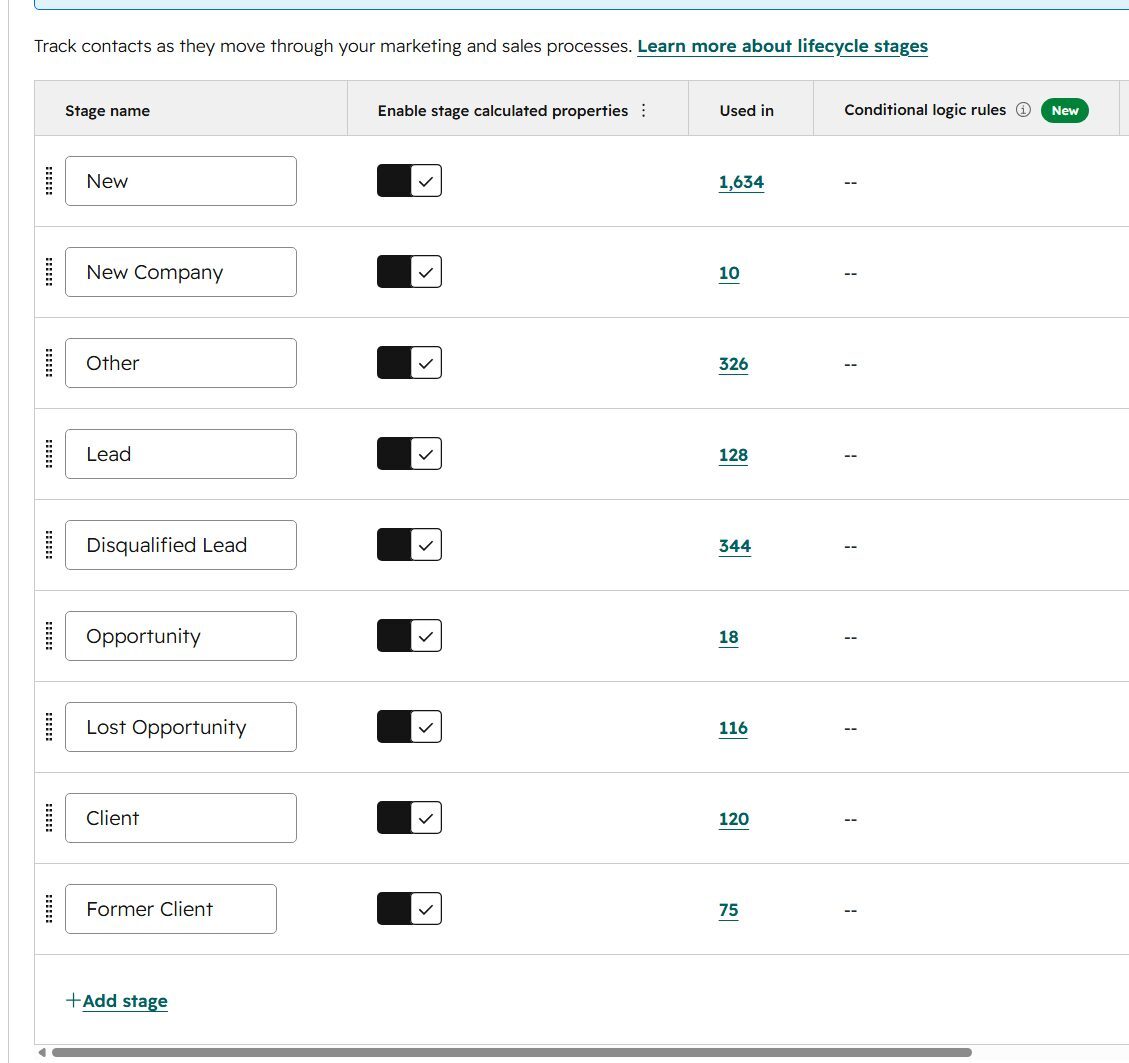
The Overview tab's “converted to client” metric only works if HubSpot knows what a client is. That mapping lives in your lifecycle stage settings: confirm your stages reflect reality and that the Overview's goal stage (Edit Goal Stage on the Overview tab) points at the right one, whether yours is called Client, Customer, or something else.
Sources: HubSpot Knowledge Base (Configure buyer intent, Set up markets, Configure research intent) and HubSpot's Product and Services Catalog. Credit figures current as of July 2026.